
The new branch structure and functionalities are being rolled out to goUrbans customers consecutive
General
Managing multiple areas within one branch gives the fleet operator a lot more flexibility to structure the business, such as:
- Different business areas for different vehicle categories
- Customizing restrictions for specific areas (exp.: max speed)
- City license restrictions in terms of number of vehicles in a specific area (MDS or custom)
Therefore areas give the necessary flexibility to solve the mentioned problems by adding custom configurations and management of multiple geofence areas within one branch. Additionally annotations and granularity of areas within branches enable support for MDS requirements (capacity for areas) and in depth analytics.
Details
One Location branch can contain multiple areas, where one area can contain multiple geofences. Each area is, for a basic configuration, defined by it’s name, area type, vehicle categories, tags, and indicator if the area is enabled or not. Area can also have advanced configuration which are determined by area types.
In the dashboard, area management is being done from one screen. Is order for operator to manage areas and area types, they need to go and create or edit location branch, and on the second step they can modify their areas and area types.
Working with area types
Area types are basically settings for areas. Each area type can have defined name, description, color, color opacity and border thickness, alongside with different options which should be enforced on the areas where area type is selected, like: end rental restrictions, parking restrictions, speed limit, etc. So, on area types user can define if the area where area type is applied will have speed limit, but in the area itself the actually limit is required to be entered.
In order to manage area types, while on the second step of location branch create/edit, operator needs to click on the question mark icon on bottom right corner, next to zoom controls of a map. That will open up a modal listing all area types available.
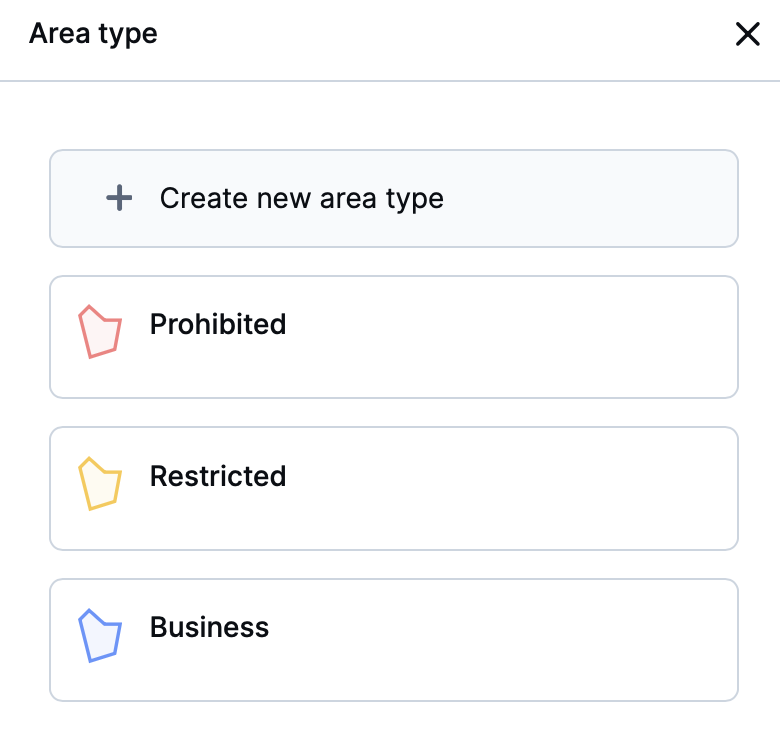
Area types
In this modal, operator can see 3 already predefined area types: Business, Restricted and Prohibited.
In order to create area type, operator needs to click on Create new area type button, or otherwise in order to edit or delete already existing area type, they need to click on an area type they’d like to modify or delete.
In any case, user will get the same content, but in case they’re editing area type, all the info will be pre-populated.
-png.png)
Area type settings
User needs to define area type name, area color (including opacity and border thickness) and area type options and restrictions.
In order to define custom area type color, user should click on a + sign in area color section where the color picker would be presented where color, opacity and border thickness (numeric representation of border thickness by default is 1, but can be changed to values from 0 to 10) can be defined, and they need to confirm it by clicking on a button Add color. Once new color has been added, it will be displayed in the area color section on area type.
Options that can be selected:
Allow end rental
Allow end rental option is used for areas where all main operations are being done. This allows end users to start rentals, end rentals, create booking, etc.
When this option is turned on, End rental restriction is turned off and disabled because these 2 options can coexist.
When this option is turned on and when area type containing this option is applied on an area, operator will be offered to fill in the end rental capacity (see below How to use end rental capacity feature).
Restrictions that can be selected:
End rental
End rental restriction is used to forbid users from ending their rentals, and therefore from starting the rental, unless otherwise defined in rental requirements.
When this option is turned on, Allow end rental option is turned off and disabled because these 2 options can’t coexist.
Parking
Parking restriction is used to forbid users from doing temporary parking on the area where area type with parking restriction turned on.
Speed limit
Speed limit is used to lower maximum speed limit on vehicles going through areas where area type with speed limit is applied.
When this option is turned on and when area type containing this option is applied on an area, operator will be offered to fill in desired speed limit (see below How to use speed limit functionality).
In order for changes of area type to be saved, user needs to click on a Save button on bottom. If, on the other hand, they’d like to discard their changes, they need to click on Discard button.
💡 Editing or deleting area type which is already applied to some areas might lead to undesired results in case options and/or restrictions of area type are changed.
In order to delete area type, user should enter edit mode of area type and on the bottom to click on an icon with bucket, which would show confirmation modal asking user if they’re sure they want to delete area type.
Create a new area
In order for user to create new area which can include multiple geo-fences is to start by clicking on a button Create new area on top left corner of the screen. When this button is clicked, user needs to immediately start drawing their first geo-fence that needs to be contained in the area. Once the polygon is “closed” area will be created and area settings side panel will activate.
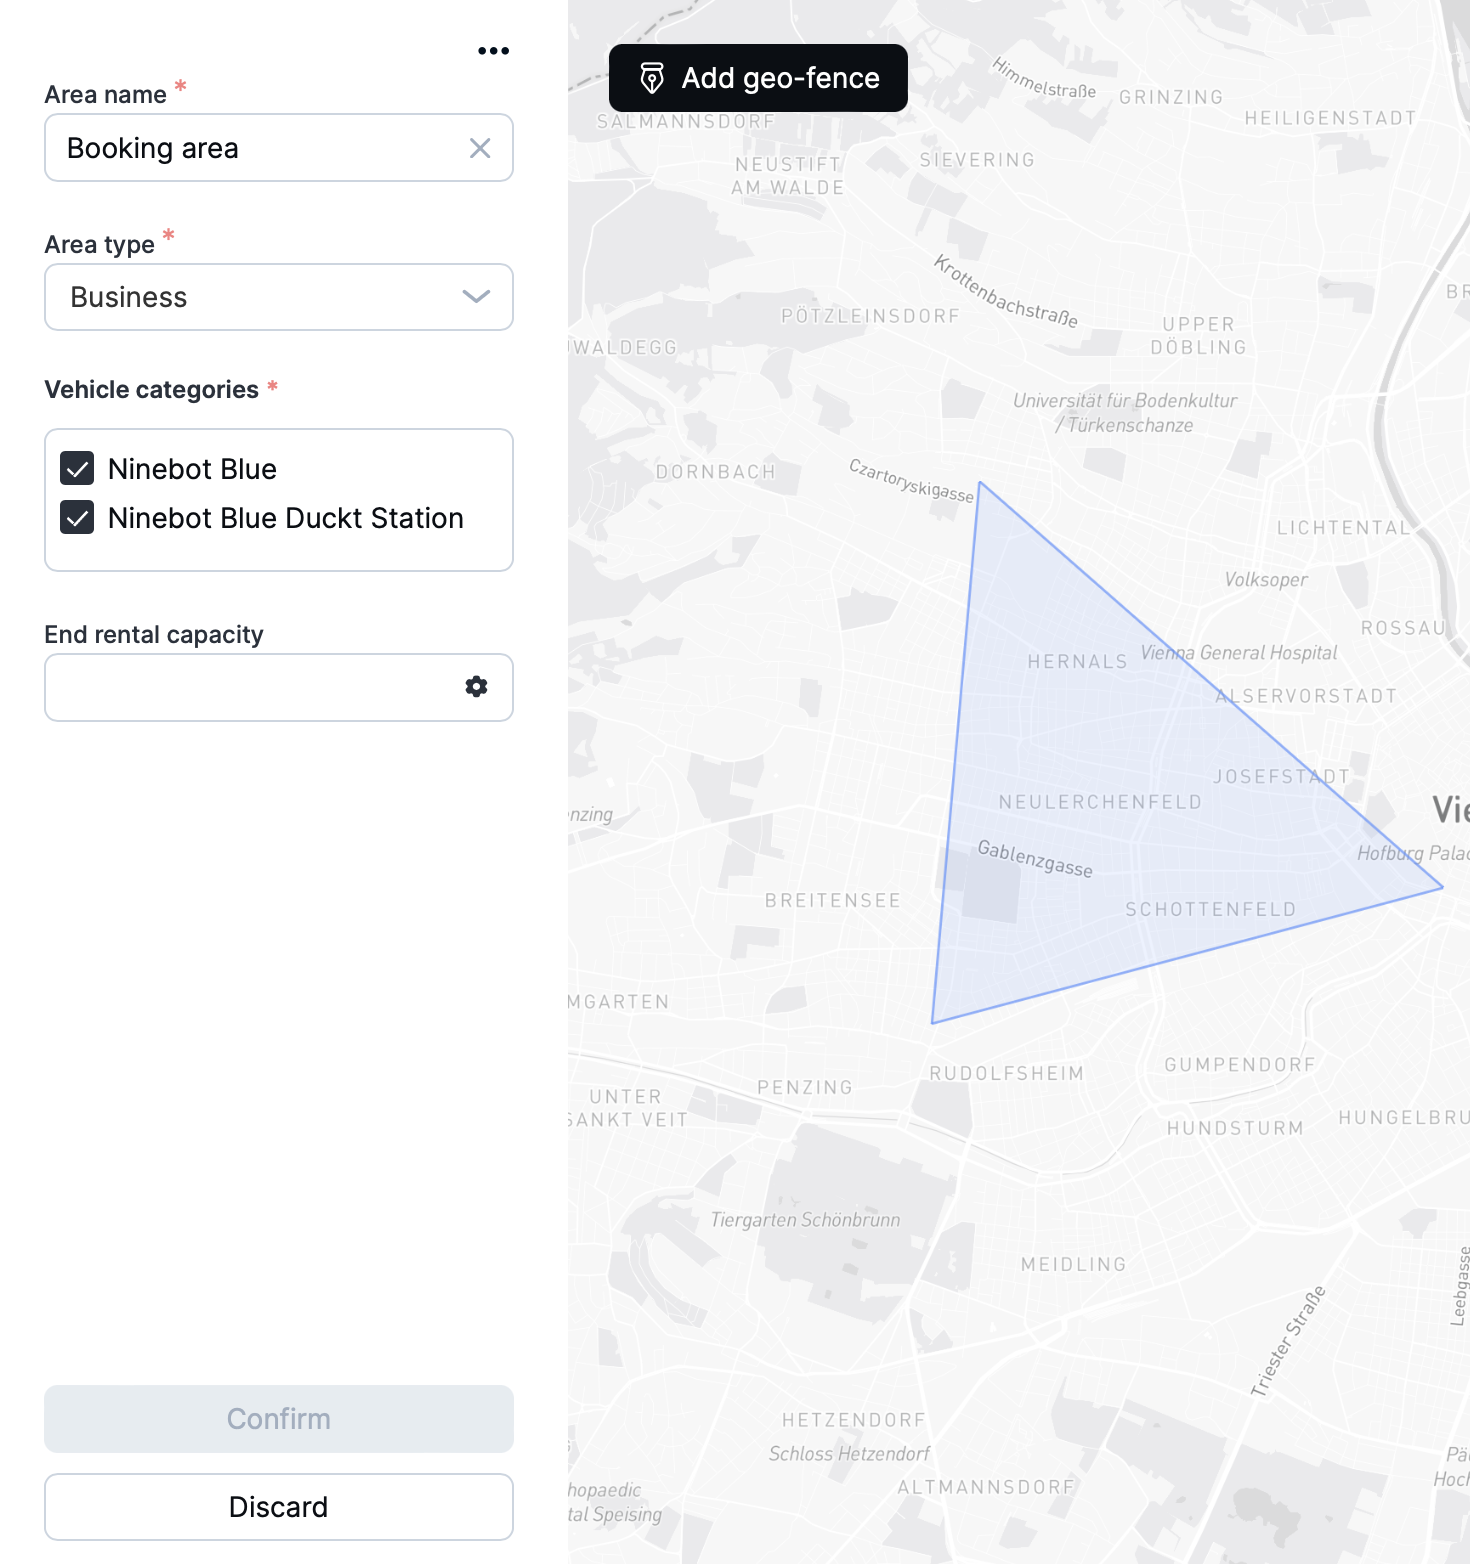
In that side panel user will be asked to enter area name, to choose area type to be applied on the area, and to choose to which vehicle categories the area configuration is applied to.
Depending on the area type and it’s options and restrictions, additional fields might show up (like end rental capacity and/or speed limit) - see more regarding this in area type configuration (see above Options that can be selected).
Once all desired details are configured, user needs to save changes by clicking on a Confirm button on the bottom of side panel. In order to discard all changes, they should click on Discard button. In order to save all changes, user needs to additionally click on Save button on top right corner.
💡 All area changes will be lost if user doesn’t click on a Save button on top!
If user wishes to edit an area and/or geo-fence inside an area, they should click on geo-fence contained in that area. In case one area side panel is already open and user clicks on geo-fence belonging to another area, user will be switched to edit that area. In case there are unsaved changes in area that is already open, user will be warned that there are unsaved changes and that they need to save it in order to change selected area.
When user clicks on geo-fence and area configuration side panel opens, then all geo-fences that don’t belong to selected area will become more transparent so the geo-fences belonging to the area will stand out from the others.
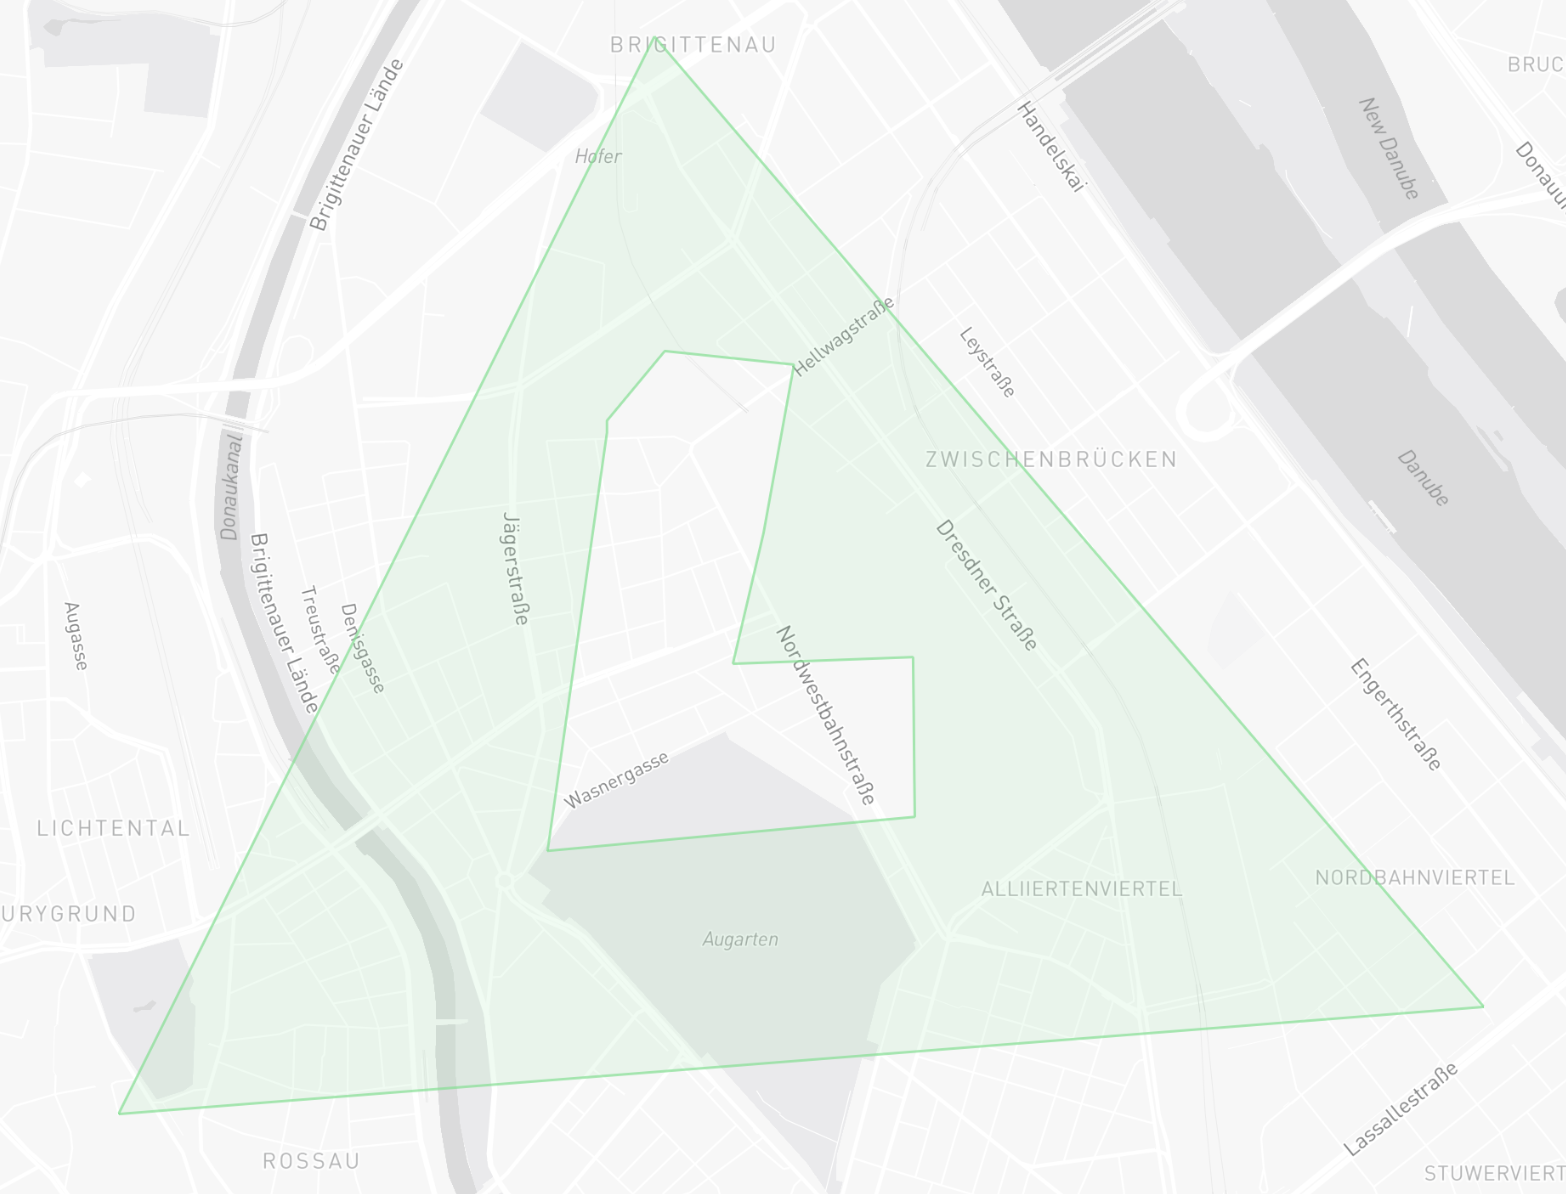
How to draw multiple geo-fences contained in one area?
One area can have multiple geo-fences. All those geo-fences in one area are sharing all the settings. For example, if an area has end rental capacity set to 10 vehicles, then all geo-fences share the end rental capacity amounts in a way that if all 10 vehicles get parked in one geo-fence, no vehicles can get parked to another one.
In order to have multiple geo-fences in one area, operator needs to get into edit mode of an area (where area side panel configuration is open). Then, a new button will show on top left corner next to side panel, called Add geo-fence. User needs to click on that button in order to be able to draw new geo-fence. Once user finishes drawing all geo-fences in the area, they need to Confirm changes of the area.
How to cut geo-fence
In order to cut a hole in geo-fence, user needs to click on a geo-fence they’d like to cut. When geo-fence is selected, a new tool will be shown next to Add geo-fence button with scissors for an icon. User needs to click on it and then draw the polygon they’d like to exclude from drawn geo-fence.
Geo-fence with cut out part
How to delete geo-fence from area
In order to delete geo-fence from an area, user needs to select the geo-fence they’d like to delete. After that, new button will be shown next to Add geo-fence button with a bucket for an icon. User needs to click on it in order to remove geo-fence.
How to delete whole area and all geo-fences inside
In order to delete whole area and all geo-fences inside that area, user needs to open that area in edit mode (by clicking on any geo-fence belonging to that area). Once the area configuration side panel is open, user should click on three-dot menu on top right corner which would open up the menu where Delete area option is the one user needs to click in order to delete whole area and all geo-fences inside. Once clicked, user will be asked to confirm area deletion.
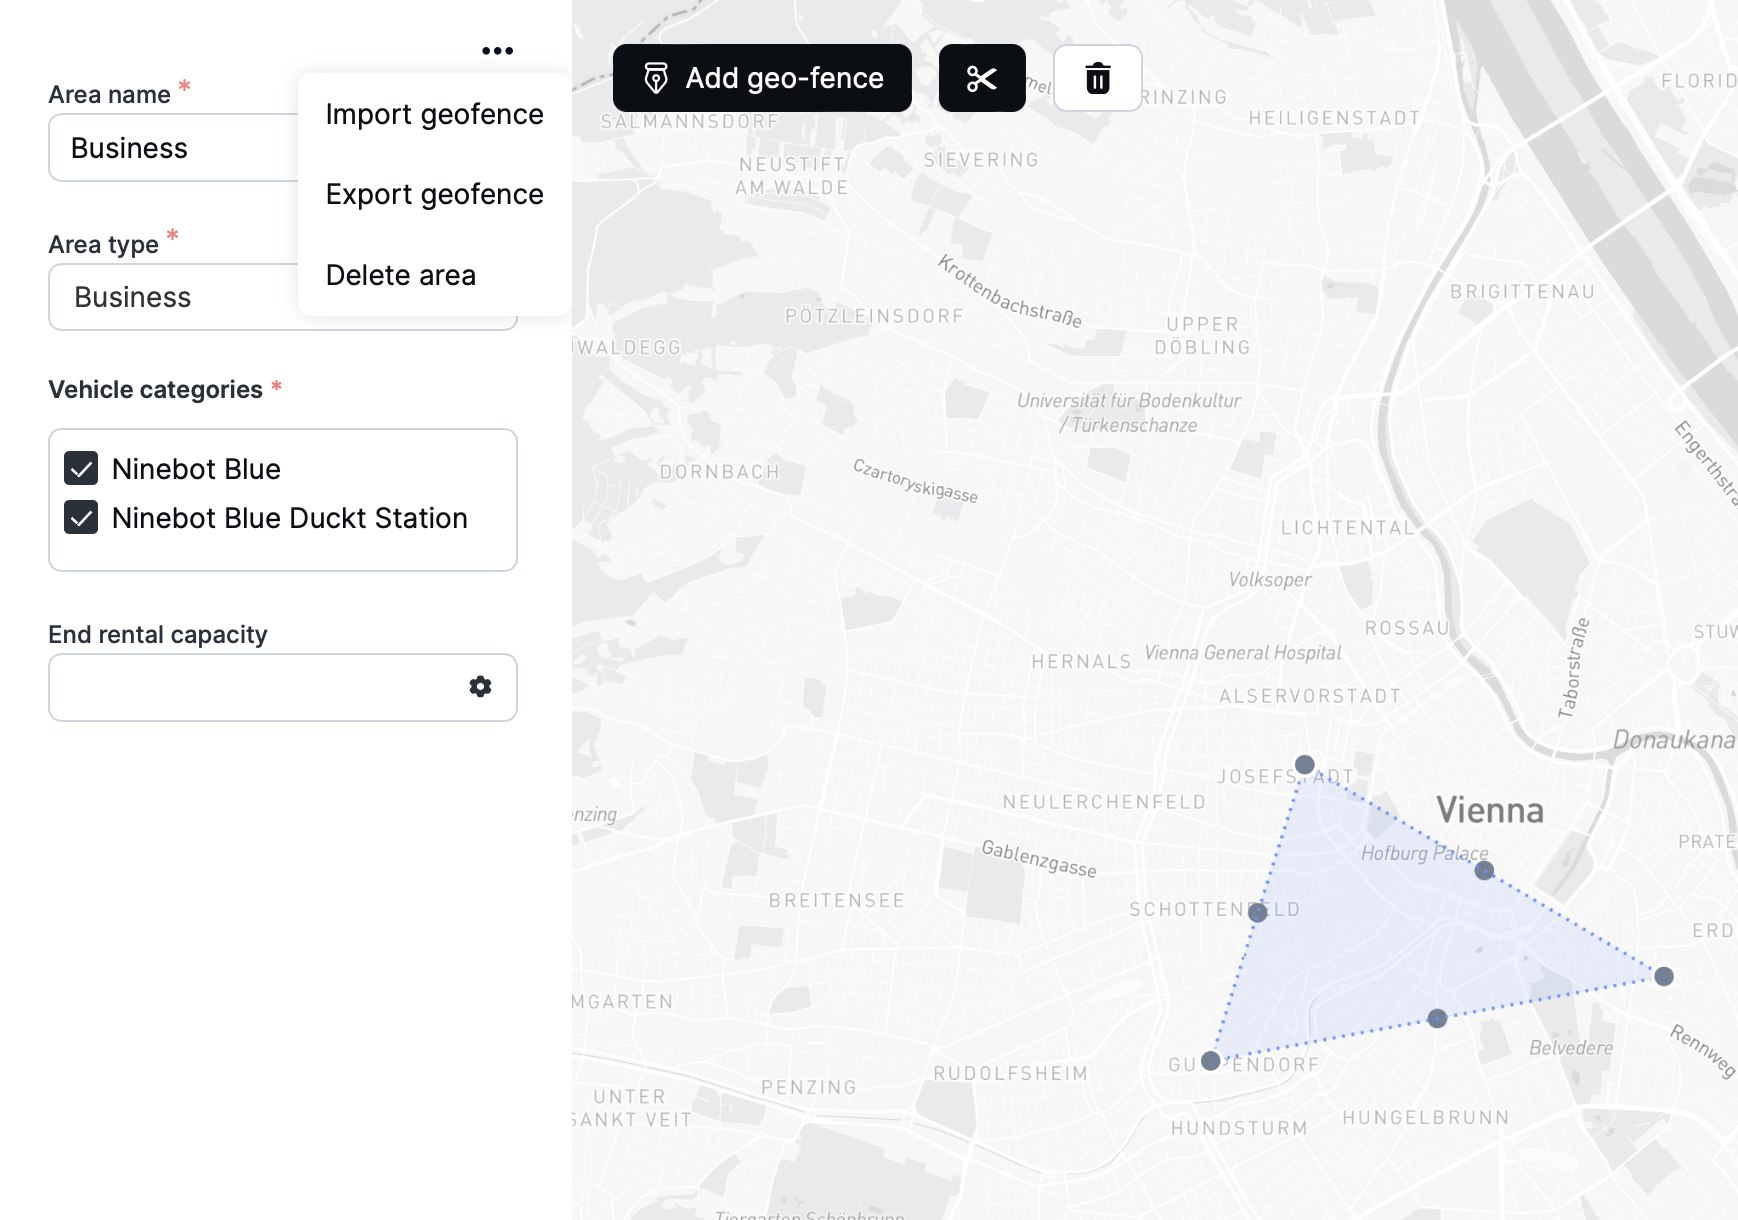
How to use geo-fence export and import options
If user wants to export geo-fences from area (in order to, for example, import them to another area), they need to click on any geo-fence belonging to that area which would open area configuration side panel. On that panel, user should click on three-dot menu on top right corner in which there are options to Export geofence. Once clicked, download of geo json file will start which will be named after the area itself.
In order to import that geo json inside another area, user needs to click on Import geofence option inside three-dot menu on area configuration panel. An import geofence modal will be shown in which user can drag&drop files which they’d like to import, and confirm it by clicking on Import button, or by clicking on Cancel button in case they changed their mind.

Area import geo-fences feature
How to use speed limit functionality
For all areas that are using area type where speed limit restriction is turned on, users will be able to specify speed limit that’s going to be enforced for all vehicles belonging to vehicle categories specified in the area itself.
When area type containing speed limit restriction is applied to area, user will get one additional input where they can specify the speed itself.

💡 The speed zone will only take effect if the “max speed” property of the vehicle category is configured.
How to use end rental capacity feature
For all areas that are using area type where Allow end rental option is turned on, users will be able to specify end rental capacity for all geo-fences configured in the area.
End rental capacity is only an optional field. If nothing is specified, then there is no limit for end rental capacity - unlimited vehicles can be parked, which, of course, belong to the vehicle categories selected in the area.
End rental capacity can be specified in multiple ways:
- Total number of vehicles
- Number of vehicles per vehicle category
To specify total number of vehicles to be allowed to end the rental in geo-fences belonging to the area, user needs to input number of vehicles in the End rental capacity field.
However, if user wants to limit only specific vehicle categories, or all vehicle categories but with different capacities, then user should click on a wheel-looking icon located inside End rental capacity field, which would open additional fields where user is able to specify end rental capacity per vehicle category.
These capacities can be mixed as well - user can specify both total number of vehicles and number of vehicles per vehicle category.
For example: total limit of vehicles allowed to end the rental is 50, but only 5 cars (vehicle category).