
The vehicle quick-view shows all the details about a vehicle
You can:
- Send commands to a vehicle
- Set a vehicle operational / Out of order
- check all available information for the vehicle in the different tabs
Send Command
You will be able to send to a specific vehicle, a command that has been enabled at the Dashboard for the vehicle category.
In the dropdown, you will also have the option to retire a vehicle. This is needed, if a vehicle is e.g. too damaged, you replace or sold it. Please always unlink the IoT module, if you want to continue using the IoT module after retiring the vehicle.
Set Out of Order / Operational
If you want to prevent a vehicle from being available for rides, you can set the vehicle out of order. Once the vehicle is ready to be used for rides you can set it back to operational.
There are 8 tabs available in the vehicle’s quick view:
Details
You will be able to see all the available information for the vehicle including ID, Vehicle Category, Branch that the vehicle is assigned to, Name of the Vehicle, License Plate, QR Code, VIN, tags, labels, inspection date, the address where it is at, the power state, the battery percentage, odometer, a timestamp for its last movement and for when it was last seen online.
Please note that you can manually add and remove Tags but the Labels are added and removed automatically by the system.
To add new Labels please reach out to your Account Manager or to the support team by using the support@gourban.co email.
Rentals
A list with all the rentals that the vehicle has had will be displayed including the name of the user and the amount paid for the rental. If you click on a specific entry you will get the quick-view of the rental.
Notes
If needed, you can add/remove a note for the selected vehicle.
Tasks
You are able to see the tasks that have been done to a vehicle or that are still pending to be done. You are also able to add a task for that specific vehicle.
Damages
Here you will see a list of the damages that have been reported for the selected vehicle.
Logs
Here you will be able to see the location of the vehicle in a map view for a period of time. The default time is 12 hours but you can select a longer or shorter period in the calendar. When you slide the bar under the map you are able to see the movement that the vehicle has had for the time that you have selected.
You are also able to see the Service State, the Rental State, the Battery percentage, the Odometer, the Power State and the IoT level.
*IoT level refers to the voltage of the IoT - The following table shows an approximation but please remember this varies from IoT to IoT.
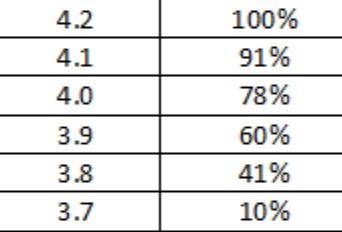 IoT level
Files
Here you can add/remove a file for a specific vehicle.
IoT Module
Here you will find information about the IoT in a specific vehicle. The internal ID is the vehicle ID. You will also be able to see the Type of IoT and the External ID which in some cases is also the IMEI number.
You can also unlink the IoT module if you either retired a vehicle but want to continue using the IoT module, or the IoT is damaged and needs to be replaced.